Wednesday, 6 February 2013

Final Outcome

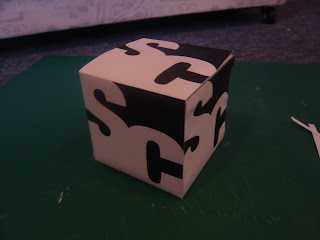
This is the final outcome of my package. 


Evaluation
These are images of my final outcome for my packaging. I feel that my overall package worked out well as I managed to laser cut into the paper despite all the versions that did not work and the fact that I had to change from card to paper for it to work without burns. This then lead me to have to put black paper behind the white paper to support it as it is rolled up and pulled out. All in all it fitted together well and functions well.


Final Test

I have now made the final net with my logo printed in it and have to test it for the last time to make sure it functions well. I rolled up some sugar paper and closed up the box, pulled and the paper and pushed it back in again. It seems to have functioned well. I will now place the real roll of paper into the box and seal it shut.


Tuesday, 5 February 2013

Laser Cutter

Today I used the laser cutter to do a final aspect of my design. I cut words into card and tested the laser cutter with my designs to see how it would turn out and if there were any changes that needed to be made. I feel that this practice was worth it as it all went wrong. When I cut my words out the lining up was wrong or the laser was too strong and put burn marks onto my work. This was not good. I decided to try using the laser with just paper rather than card and even though is might not be strong enough to hold inside my net I gave it a try anyway. To mt surprise it all worked out well on paper with no burn marks at all. These were only practices and I will do the final thing tomorrow. Pictures below display my process:


This the print out of my final net. Unfortunately I couldn't laser cut the net as it wasn't lined up properly with the laser. Because of this I hand  cut it but very precisely. The end result was good as all edges were perfect. 


These are the 3 separate times I attempted the laser cutter. These first few times were on printed card and didn't work out as I expected. The small letters all merged together as the letters were very small. This meant that I had to turn down the intensity of the laser to achieve a thinner line. I attempted this multiple times until I realised that it was the material I was using, it was too thick of a card for the laser to work neatly. 


This is the laser cut practice on paper, the better material to cut on for what I want to achieve.
Because of the effect that the practice had on paper I decided to use this material instead of card. The laser cut words are much clearer on this material and therefore will be seen much better on my final design and will have the final look that I am aiming for.  

Monday, 4 February 2013

Mock up

I designed a basic cube net for my final design and added my logo on each side so that it covers each side completely. I feel that this will have a good effect and covers any white space. Below is a prototype I made from paper.


By making this prototype I have realised that the final material used for the net cannot be paper as it is too thin. I will need to use a thick card for the net be able to glue together well and withstand general use.

Logo Decision

I numbered all of my logos and asked around to see which people liked the most. I narrowed it down to three designs. These are below.

1.

2.

3.


These are the three that the voting narrowed it down to. I have decided to choose number 3 as I feel it bests represents me as a designer and looks the most professional.  It uses white and black space well and you have to think about it to understand it as the bottom of the two letters has no outline. This logo could also work with the colours the other way around. It could also work with different colours. This means it has a good variation but always demonstrates the same message that I want to say about myself as a designer.

Further Net Development

Here are a few images of the further development I have done to my net. I decided to make it twice as big, this way it will stand out as it is slightly bigger than my palm, it will sit well in my palm and can be handled easily. I practiced the functionality of the package by putting in the roll of paper and pulling it in and out of the box. I managed to figure out how thin and thick the slot needs to be to enable the paper to move in and out of the box with ease and without the paper ripping with this constant action. The slot needs to be the length of the box minus just a few centimeters on each side. The thickness needs to be just a few millimeters as i don't want the slot to be so thick that the paper falls back into the box when to being used.

The next stage of my development is to find out which side and where I want to put my logos.


Sunday, 3 February 2013

A-Z

For the paper that will come out of the box for my final idea I have put together an A-Z of words about design and my interests in general. I tried to sum up what I think about design with a descriptive word for every letter of the alphabet. Below are what I have come up with:

A- Aspiration
B- Beginning 
C- Composition 
D- Doodle
E- Energy 
F- Fear
G- Genesis
H- Humility 
I-  Idea 
J-  Judgment 
K- Knowledge 
L-  Love 
M- Meaning 
N- Notion 
O- Open
P- Playful
Q- Quirky 
R- Reason
S- Significance 
T- Thought 
U- Understanding 
V- View
W- Worrying
X- X
Y- Youthful
Z- Zing 

I will put these words onto the roll of paper in different fonts and using different techniques to try and represent the word in the best way. This will then pull out of the box starting with A and the audience will be able to see these one after the other whilst interacting with the package.

Tutorial

After the tutorial on Friday I decided to use a different final idea instead of the one I had in mind. The new final idea is one of the prototypes I made; the box with the receipt mechanism. I have made another prototype but changed the design slightly so that the roll of paper can be pulled out easier.


This box is 6cm*6cm. This is just a practice size. For the real thing I think the box itself will have to be bigger so that it can show my logo clearly and contain the roll of paper at ease. It also needs to big enough to have my laser cut designs on so that they are clearly visible.